Saturday, December 20, 2008

#2 Miter Square Afghan


It has been a while since an update on my current miter square afghan. I'm almost done. Here is a photo from 2 weeks ago. All these yarns are koolaid dyed Patons wool.

Bias Garter Scarf - half done


Here is a picture of my scarf! A few tips. If you are confused about which side of the scarf you are on, put a marker close to each edge on the front side and move it up as you knit. This way you will know when you are on the increase/decrease side. Also, it is a good idea to count your stitches as you knit, your stitch count never changes.


Take a look at your edges. On the increase side, you will notice a small hole. The decrease side looks different. Perhaps you have noticed that I placed the increase and decrease 1 stitch in from the edge. This helps keep the edge neat. You could place them 2 or three stitches in from the edge.
Have fun knitting this scarf! By the time you finish it, you will be an expert at increasing and decreasing.

Bias Garter Scarf-Step 3 - decrease a stitch


You have knit until there are 3 stitches on the left needle. Insert you needle in the next two stitches and knit them together. You just decreased a stitch! In knitting speak, this is noted k2tog, which means, knit 2 together. Knit the last stitch on the left needle to complete the row.
Knit one row. You will be back on the right side of the knitting and you can see the marker.

This completes the pattern for the scarf. Continue to follow these two rows. On the right side, you do an increase at the beginning of the row and a decrease at the end of the row. Follow this with one row of plain knitting.


Here are the directions for the scarf in knitting terms.


1. Cast on 35 stitches.

2. On the right side row, you knit one stitch, then increase one stitch by knitting into the loop between the stitch just knit and the stitches on the left needle. Knit to the last 3 stitches, k2tog and knit 1. Turn and knit one row. Repeat these two rows until the desired length.
3. Bind off all stitches.

Bias Garter Scarf-Step 2 - increase a stitch


Knit the first stitch. Now we are going to pick up the loop between this stitch and the stitches on the left hand needle. Dip you needle into the loop between the stitch that you just knit and the remaining stitches on the left hand needle. Knit this loop. Now you have two stitches on the right hand needle. You just increased a stitch!


Knit across the row until you have 3 stitches remaining on the left hand needle.


Easy Bias Garter Scarf - Step 1

This project is an easy garter stitch scarf where you learn how to increase a stitch and how to decrease a stitch. I designed it as a second project for a new knitter. I used knitting worsted weight yarn and #7 needles.

Start by casting on 30 stitches. Knit two rows. Your yarn tail will be on the right edge. I will call this the RIGHT side of the scarf. Place a marker right by the yarn tail.

In the next step, you will learn how to increase a stitch.

Monday, November 17, 2008

Puppy CAM

I say a watching bunch of puppies is one great reason for internet cameras. Click on the link below to watch and listen!


http://www.ustream.tv/channel/shiba-inu-puppy-cam

Tuesday, October 14, 2008

Yarn after dyeing


I just realized I never posted the picture of the finished koolaid varigated dyed yarn. Here it is with the original yarn beneath it.

The Second Afghan


I started my next afghan after koolaid dyeing lots of yarn in green, blue and purple. This time, I'm using two colors in each mitered square. I knit with the first color until there are 9 garter ridges and I am on the right side. I think this is when there are 14 stitches on each side. Then I switch to a second color. I love doing these squares and can envision many variations. I'm going to try and change just one thing at a time.

In the picture you can see that I have completed 2 squares in the first column and I have started the third square. I have to admit, the first column is not my favorite. I LOVE the ease of just picking up stitches that comes after this column is done. I took this photo late last week. This morning, I started on the second column!! YEAH it is all knitting nirvana from here on.

Friday, October 3, 2008

It is Finished!


I finished my 9 x 9 block afghan this week! To stabilize the edge, I did two rounds of single crochet with a size G hook. It is a bit ruffled, but it still looks good. I have posted two photos, one of most of the afghan from the front and a second that is more of a closeup and shows the back of the afghan. I really like how this pattern makes an almost perfectly reversible afghan. I didn't block it. Any comments on that? I usually block garments, but this seems really fine the way it is.

Thursday, October 2, 2008

Dyeing the Yarn


  1. After hanking the yarn, I place two hanks in the shallow container (lengthwise, in the picture the white yarn is at the top and the natural yarn is at the bottom) and add lukewarm water. Next, I make sure the yarn is totally saturated with the water. You can let the yarn sit to make sure it is saturated, then pour off the excess water.
  2. Now you need to mix the koolaid. I add about 1/4 cup of water to a glass and then a full pack of koolaid. Stir it until all is dissolved and it is ready to go on the yarn. I usually use three packs when I dye two hanks in the shallow containers. For this one, I mixed up 1 pack of Berry Blue in one glass and 2 packets of lemon-lime in another glass.
  3. Pour one of the colors on one side of the container and then push the color through the yarn with the back of a spoon. Pour the other color on the other side and push through the yarn. (The top picture shows the yarn before it goes into the microwave)
  4. Put the container in the microwave with the cover loosely over the top. Microwave on high for 1-2 minutes. Check to see if the water has cleared. (The second picture show how the water clears when there has been enough heat.) If it hasn't then continue to microwave for 1 minute intervals until it is clear. Usually, the water will clear in 2-3 minutes of microwaving. You do not want to heat it anymore than necessary.
  5. Now you need to let everything cool down. You do not want to add cold water to hot wool yarn, it will felt it. Once it cools down, rinse it with lukewarm water, wring out the excess water (I use my salad spinner) and then let it dry.
  6. THAT is IT! It is simple, safe and fun!

Tuesday, September 30, 2008

Getting Ready to Dye


I dyed all the yarn for my afghan with Koolaid! Koolaid dyeing is fun and safe. All you need is wool yarn, some containers and a microwave.


  1. First, the yarn. You need wool yarn. I live in a rural area and my closest store is a Ben Franklin. They have two brands of wool. I buy different colors. The picture with this post shows you four colors that I like to work with. The white yarn gives bright pure colors. The grey heather yarn gives much darker more muted colors. The natural and tannish color give less bright colors.
  2. I turn the balls into hanks by winding them around a chair and then I tie them with a piece of string. I wind 2-4 hanks from each ball. I dye two of these hanks at a time in my shallow dye containers. I use 2-3 packages of Koolaid for these two hanks. SO, you will need 4-6 packets of koolaid to dye one of these balls of yarn.
  3. I buy lots of Koolaid and keep all the colors stockpiled. There is really only one green, that is lemon-lime. This summer, I found Berry Blue and now I have a really good standard blue. I use grape, cherry, black cherry, orange and lemonade as base colors. You can mix almost any color with these. The grape has lots of black in it and is very good for toning down colors.
  4. You'll need containers. It is best if they have a cover. When I dye multicolored, I use a shallow container that I bought at IKEA. It is about 9" x 12" and fits perfectly in my microwave. I also use 1 lb dannon yogurt containers I eat lots of yogurt and have a stack of these containers! Mostly, I use these for dyeing single colors. Gather you goods and in the next post, we'll get dyeing!

Selecting the colors of Squares

My sister, Heidi, asked for suggestions on how to select the colors for the squares. I had to think hard about this one as it is something I do on the go.

My only guideline in picking the next color was to try and make sure it looked good with the colors next to it. That and I tried to mix up the blue and the green as much as I could. I didn't have much of the purple, so I tried to keep those far apart.
Wednesday, September 10, 2008

Done with 8 x8 afghan

I finished my 64th square this morning. The eighth one in the eighth column and IT IS TOO SMALL!! The whole afghan measures 42" squarish.

I knew at the beginning that it was a bit short, but I thought it might stretch. I also thought I might put on a border. But now, I just love the simplicity of the squares, so I will probably only crochet around the edge to satabilize it.

I am going to make it 9 x9. Here is an important note for you: measure the length of your first column. If it is too short (as mine was) make 9 squares per column and 9 columns.

Saturday, September 6, 2008

Adding Squares to Column 2 - The Center Stitch

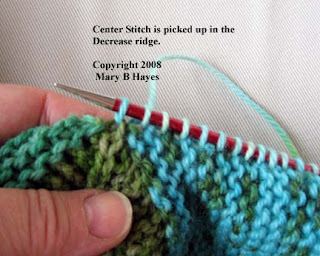
In the last step, you knit the first square (which is #9 in the picture from several posts ago) in column 2. Now the squares get so easy. All you do is pick up 22 stitches from the top of the last square, just like you did in the first column for Squares 2-8. Then you pick up a center stitch, which I have pictured for you. This is the top stitch of the center decrease ridge. Then you pick up 22 stitches on the side like we just did in Steps 2 and 3 for the first square in this column. Now you have all the basic steps for constructing your afghan.

The Second Column of Squares- Step 3

This first picture shows you the pick up loop of stitch 21. It is the ridge just below the decrease ridge. The next stitch is picked up BEHIND the decrease ridge. The second picture shows this stitch after it is picked up!

Now you are read to turn the work and knit the mitered square. Start with Row 1, which is the wrong side.


The Second Column of Squares - Step 2


The very first pick up stitch is the center decrease ridge stitch. I like to pick this up at the very bottom of Square #1.


Then I move to the ridges on the side of Square #1 and pick up the next 21 stitches.

The photos show the pick up of Stitch 23 and the needle inserted into a ridge as I pick up the first of the 22 stitches from the side of Square #1. I pick up 21 stitches on the side and that takes me right to the top of the decrease ridge of Square #1.

In the next step, I will show you where I pick up the very last stitch.

The Second Column of Squares - Step 1


Once you have finished your first column of squares, you build on that column. To do the first (bottom) square in the column you have to cast on 22 stitches and then pickup 23 stitches on the side of square #1. In the picture, Square #1 is the dark blue and the new square is the lighter blue.

This photo shows 22 stitches cast on the needle and the side of square #1 where you will pick up the stitches.
Thursday, August 28, 2008

The Order of the Squares

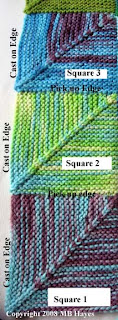
Now that you have finished your first two squares, you should see that you knit the squares in columns where the next square is done on top of the previous square. You pick up the stitches of one edge and cast on additional stitches for the other edge. The first picture shows you the first three squares of my afghan.

Now you will need to do a column of 8 squares. Every square involves casting on stitches in the first column. This is only true for the first column! It gets easier!


In all the remaining columns, you only need to cast on stitches for the FIRST square. All the rest are done by picking up stitches. This second picture shows you the knitting order of the squares in my afghan. I will give you directions for square #9 in my next post.

Square #2


The first photo shows you the top of the mitered square, which is where you ended up on the last post.

I told you to put the yarn through the last stitch, but if I am going to start the next square, I usually just leave the stitch on the needle and begin the next square.

You need 45 stitches to start the next square. For the first column of the afghan, you will be picking up 22 stitches along the top of the last square knit and then casting on 23 stitches. Once you have done this, you follow the directions for the first square! It is as easy as that.

So, the last stitch of the previous square becomes the first stitch of the next square. With the new color for the next square, pick up 22 stitches along the top of the square. You can pick these stitches up between the garter stitch ridges as shown in the pictures. Counting the first stitch, you will pick up 22 stitches. Now cast on 23 additional stitches. You are ready for the first row of the mitered square which is knit 22, purl 1, knit 22. Follow the directions and complete your second square.

The First Square


Here are the directions for the first mitered square. The first knit row is the wrong side of the piece. Even rows are the right side of the piece. The 4 pictures show you how to do the double decrease that is at the center of the square. It is the part of the directions that are between the asterisks.

Cast on 45 stitches.
  1. Knit 22 stitches, purl 1 stitch, knit 22 stitches.


  2. Knit 21 stitches, *put your needle in the front of the next two stitches and slip to the right hand needle. Knit the next stitch and pass the two slipped stitches over the knit stitch.* Knit 21 stitches.


  3. Knit 21 stitches, purl 1 stitch, knit 21 stitches


  4. Knit 20 stitches, repeat the step between the asterisks in step 2, knit 20 stitches.


  5. Knit 20 stitches, purl 1 stitch, knit 20 stitches.


  6. Knit 19 stitches, repeat the step between the asterisks in Step 2, knit 19 stitches.

Can you see the pattern? On the right side, you always have one less stitch on each side of the knit ridge stitch. You are decreasing 2 stitches on every right side row. Continue until you have only 3 stitches and you are on the right side. To end, just repeat the decrease between the asterisks, cut the yarn and pull it through the loop. Your first square is finished!

Project for Afghans for Afghans

This blog is dedicated to my mother, Vallanee Hayes. She gave me a life long interest in knitting. I wasn't the only one. All of my siblings (there are six!) are interested in fiber related crafts.

When she passed away in January of 2007, my sister, Heidi, suggested that we knit together in her honor. Heidi had knit for an organization that sends knits to children in Afghanistan, Afghans for Afghans. I'm starting this blog with a project that I started for the fall 2008 campaign: An afghan that is at least 45" square.

The picture shows my project in progress. I am going to give you step by step directions. This afghan is knit one square at a time. Each square is knit by picking up stitches from the previous square(s). It is a great project for using up scraps. It is also a great pick up project because the square knitting is always the same.

I'm knitting with knitting worsted weight wool yarn. The Afghans for Afghans project requires only wool yarns. You will need to have your yarns be of similar size so your gauge does not change. I've used mostly Patons, Plymouth and Brown Sheep wools in my project.

I am using #7 needles. Beautiful Signature needles with stilleto points. These are fabulous needles made in Wisconsin. (My father, Stanley, saw an article about this company and then purchased the #7 needles for birthday presents in 2007 for all of his knitting girls. This year, he gave us #6. What a wonderful thoughtful present! Thanks DAD!) You pick up stitches to start new squares and the stilleto points make this so very easy.

You need a small amount of yarn to make a single square. I am getting about 6-8 squares from a 100 gram ball. My initial square wasn't so square. It was 5" x 5.25", so I did a column of 8 squares and plan on 9 of these columns for a total of 72 squares. I will put some kind of edging on, but that decision will be made later.

Get out you needles and let's get started! The next post will tell you how to make your first square.