Tuesday, September 30, 2008

Getting Ready to Dye


I dyed all the yarn for my afghan with Koolaid! Koolaid dyeing is fun and safe. All you need is wool yarn, some containers and a microwave.


  1. First, the yarn. You need wool yarn. I live in a rural area and my closest store is a Ben Franklin. They have two brands of wool. I buy different colors. The picture with this post shows you four colors that I like to work with. The white yarn gives bright pure colors. The grey heather yarn gives much darker more muted colors. The natural and tannish color give less bright colors.
  2. I turn the balls into hanks by winding them around a chair and then I tie them with a piece of string. I wind 2-4 hanks from each ball. I dye two of these hanks at a time in my shallow dye containers. I use 2-3 packages of Koolaid for these two hanks. SO, you will need 4-6 packets of koolaid to dye one of these balls of yarn.
  3. I buy lots of Koolaid and keep all the colors stockpiled. There is really only one green, that is lemon-lime. This summer, I found Berry Blue and now I have a really good standard blue. I use grape, cherry, black cherry, orange and lemonade as base colors. You can mix almost any color with these. The grape has lots of black in it and is very good for toning down colors.
  4. You'll need containers. It is best if they have a cover. When I dye multicolored, I use a shallow container that I bought at IKEA. It is about 9" x 12" and fits perfectly in my microwave. I also use 1 lb dannon yogurt containers I eat lots of yogurt and have a stack of these containers! Mostly, I use these for dyeing single colors. Gather you goods and in the next post, we'll get dyeing!
Selecting the colors of Squares

My sister, Heidi, asked for suggestions on how to select the colors for the squares. I had to think hard about this one as it is something I do on the go.

My only guideline in picking the next color was to try and make sure it looked good with the colors next to it. That and I tried to mix up the blue and the green as much as I could. I didn't have much of the purple, so I tried to keep those far apart.

Wednesday, September 10, 2008

Done with 8 x8 afghan

I finished my 64th square this morning. The eighth one in the eighth column and IT IS TOO SMALL!! The whole afghan measures 42" squarish.

I knew at the beginning that it was a bit short, but I thought it might stretch. I also thought I might put on a border. But now, I just love the simplicity of the squares, so I will probably only crochet around the edge to satabilize it.

I am going to make it 9 x9. Here is an important note for you: measure the length of your first column. If it is too short (as mine was) make 9 squares per column and 9 columns.

Saturday, September 6, 2008

Adding Squares to Column 2 - The Center Stitch

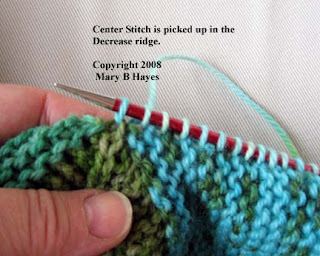
In the last step, you knit the first square (which is #9 in the picture from several posts ago) in column 2. Now the squares get so easy. All you do is pick up 22 stitches from the top of the last square, just like you did in the first column for Squares 2-8. Then you pick up a center stitch, which I have pictured for you. This is the top stitch of the center decrease ridge. Then you pick up 22 stitches on the side like we just did in Steps 2 and 3 for the first square in this column. Now you have all the basic steps for constructing your afghan.

The Second Column of Squares- Step 3

This first picture shows you the pick up loop of stitch 21. It is the ridge just below the decrease ridge. The next stitch is picked up BEHIND the decrease ridge. The second picture shows this stitch after it is picked up!

Now you are read to turn the work and knit the mitered square. Start with Row 1, which is the wrong side.


The Second Column of Squares - Step 2


The very first pick up stitch is the center decrease ridge stitch. I like to pick this up at the very bottom of Square #1.


Then I move to the ridges on the side of Square #1 and pick up the next 21 stitches.

The photos show the pick up of Stitch 23 and the needle inserted into a ridge as I pick up the first of the 22 stitches from the side of Square #1. I pick up 21 stitches on the side and that takes me right to the top of the decrease ridge of Square #1.

In the next step, I will show you where I pick up the very last stitch.

The Second Column of Squares - Step 1


Once you have finished your first column of squares, you build on that column. To do the first (bottom) square in the column you have to cast on 22 stitches and then pickup 23 stitches on the side of square #1. In the picture, Square #1 is the dark blue and the new square is the lighter blue.

This photo shows 22 stitches cast on the needle and the side of square #1 where you will pick up the stitches.