This blog is dedicated to my mother, Vallanee Hayes. She gave me a life long interest in knitting. I wasn't the only one. All of my siblings (there are six!) are interested in fiber related crafts.
When she passed away in January of 2007, my sister, Heidi, suggested that we knit together in her honor. Heidi had knit for an organization that sends knits to children in Afghanistan,
Afghans for Afghans. I'm starting this blog with a project that I started for the fall 2008 campaign: An afghan that is at least 45" square.
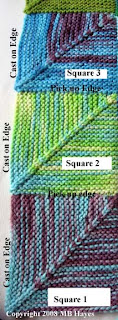
The picture shows my project in progress. I am going to give you step by step directions. This afghan is knit one square at a time. Each square is knit by picking up stitches from the previous square(s). It is a great project for using up scraps. It is also a great pick up project because the square knitting is always the same.
I'm knitting with knitting worsted weight wool yarn. The Afghans for Afghans project requires only wool yarns. You will need to have your yarns be of similar size so your gauge does not change. I've used mostly Patons, Plymouth and Brown Sheep wools in my project.
I am using #7 needles. Beautiful
Signature needles with stilleto points. These are fabulous needles made in Wisconsin. (My father, Stanley, saw an article about this company and then purchased the #7 needles for birthday presents in 2007 for all of his knitting girls. This year, he gave us #6. What a wonderful thoughtful present! Thanks DAD!) You pick up stitches to start new squares and the stilleto points make this so very easy.
You need a small amount of yarn to make a single square. I am getting about 6-8 squares from a 100 gram ball. My initial square wasn't so square. It was 5" x 5.25", so I did a column of 8 squares and plan on 9 of these columns for a total of 72 squares. I will put some kind of edging on, but that decision will be made later.
Get out you needles and let's get started! The next post will tell you how to make your first square.
 Now that you have finished your first two squares, you should see that you knit the squares in columns where the next square is done on top of the previous square. You pick up the stitches of one edge and cast on additional stitches for the other edge. The first picture shows you the first three squares of my afghan.
 In all the remaining columns, you only need to cast on stitches for the FIRST square. All the rest are done by picking up stitches. This second picture shows you the knitting order of the squares in my afghan. I will give you directions for square #9 in my next post.


